
How to Raise Your RV Trailer (Over/Under Axle Conversion)
This procedure is often erroneously referred to as "flipping the axles". The axles are not actually inverted or flipped over, but are rather re-positioned from over the leaf springs to under the springs. This simple modification will lift the trailer about 4 to 5 inches, providing much-needed ground clearance for boondocking and rough roads.
This series of pictures details the installation of a Dexter axle kit. The best part? There is no welding involved!
1. The "Before" Profile
The owner wants to raise this trailer 4 to 5 inches for more road clearance. A Dexter Axle Over/Under Conversion kit will be used.

2. The Conversion Kit Hardware
This is the contents of one axle kit. It includes new spring seats, u-bolts, and tie plates.

Ready to Lift Your Rig?
If you are tired of dragging your bumper or black tank drain on steep driveways and uneven campsite roads, an over/under conversion is the safest and most reliable way to gain clearance.
*As an Amazon Associate, this site earns from qualifying purchases.
3. Jacking and Supporting the Trailer
The trailer is jacked up and placed securely on heavy-duty jack stands . This allows the axles to hang freely so that the work can proceed. Note: Proper lifting equipment and rated jack stands are an absolute must for safety!
4. The Original Configuration
This is the original configuration of the axles. Notice how the leaf springs are mounted belowthe axle tubes. The project is to raise the trailer by re-positioning the axles so that the springs sit on topof the axle tubes.

5. Removing the Hardware
The old u-bolts and the front spring hanger nut are removed. Important:Cut the brake wires at this point to prevent accidentally tearing them out and damaging the brake magnets when you drop the axle.

6. Dropping the Axle
With the bolts removed, the axle is ready to be dropped. The axle is safely resting on a floor jack placed in the center of the axle tube.
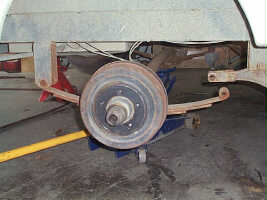
7. Repositioning
This shows the front axle dropped to the floor and rolled ahead so that the leaf spring can be re-installed above it.

The axle is then rolled back under the spring in its new position.

8. Installing the New Hardware
The kit is assembled in place with the new spring saddles (which lock into the old saddles to ensure proper alignment), new u-bolts, and mounting plates.

9. The Finished Assembly
The finished job. The spring now rides on top of the axle, utilizing the original factory mounting points.

10. The Final Result
The trailer has successfully been raised 4 inches, providing vastly improved ground clearance without altering the suspension geometry or requiring any welding.

While You Have the Wheels Off...
Since you already have the trailer securely jacked up, the wheels removed, and you are working directly with the axle assemblies, now is the absolute perfect time to inspect your braking system. Take a few minutes to check your brake shoe wear, drum condition, and magnets. If they need attention, check out our complete DIY guide on How to Adjust and Replace RV Trailer Brakes before you bolt the tires back on.