
Adjusting RV Trailer Brakes
You can do-it-yourself!
RV trailer brake adjustment is a job that most people with average mechanical skills should be able to handle. RV trailer brakes should be adjusted at least once a year, more often depending on the miles travelled, the severity of the downhill grades, and the amount of stop and go traffic that is encountered. Note: Many modern RV trailers are now equipped with self-adjusting brakes. If your trailer has self-adjusting brakes, manual adjustment is usually only required after installing new brake assemblies or shoes.
You will need a brake adjusting tool, available at most tool supply stores, a jack capable of safely lifting the trailer, and a jack stand to hold the trailer in the jacked position.
The following steps are a guide to properly adjusting your trailer brakes. What this entails is the adjustment of the star wheel which in turn sets the brake shoe to brake drum clearance. This adjustment is important - as the brake shoes wear down, the clearance increases. The actuating mechanism must travel further to effectively apply the brakes and a point can be reached where the mechanism is no longer able to do so.
- Park the trailer on firm and level ground.
- Block the trailer tires on the opposite side securely so that no forward or rearward movement is possible.
- Jack up the trailer following the manufacturer's instructions.
- Secure the trailer on jack stands of adequate capacity front and rear.
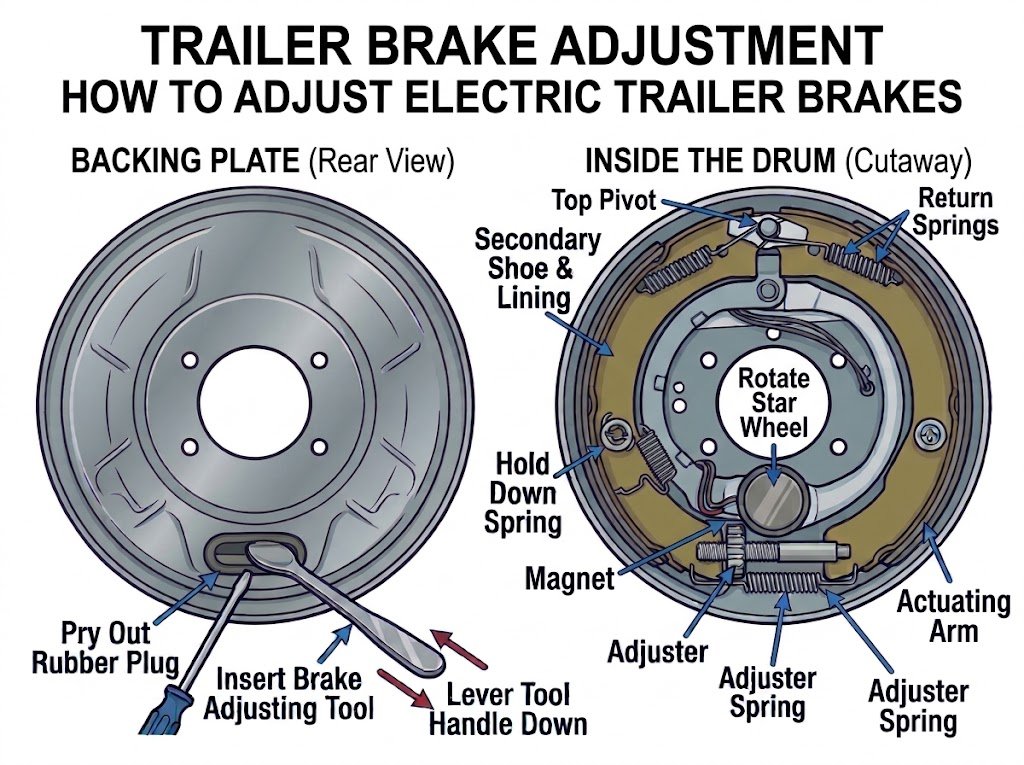
Use a brake adjusting tool to turn the star wheel inside the drum until the brake shoes lock, then back it off.
- At the back of the wheel, on the brake backing plate, there is a small rubber plug near the bottom of the backing plate. Pry out this plug to give access to the star wheel adjuster.
- Some trailers have a drop axle suspension system and the axle covers most of this adjusting hole making it difficult to use the brake tool. Patience will win out in the end if you keep at it.
- Insert the brake adjuster tool and maneuver it so that the tool engages with the teeth in the star wheel. The star wheel looks like a gear with exposed teeth on the perimeter. On most trailers, you would pull down on the tool handle which levers on the bottom of the hole and turns the star wheel up (as you are looking at it from the back of the wheel). Just to make it more difficult, the star wheel is located well inside and some maneuvering is required—a flashlight will help to locate the starwheel.
- Turn the adjuster until the brake locks up, i.e., you can no longer rotate the wheel by hand. This centers the brake shoes on the brake drum so that they are in the correct position.
- Now back off the star wheel 8 to 10 clicks or as specified by the manufacturer. The wheel should spin freely with no apparent drag to slow it down. A slight scraping noise is normal as the wheel turns.
- Repeat this procedure for all the wheels.
Congratulations, you have successfully adjusted your own trailer brakes ... that wasn't so bad, was it?
How to Determine Your Axle Capacity and Brake Size
If your brakes are worn beyond adjustment and need to be replaced, you must order the correct size. Trailer brakes are not universal. You need to know two things: your axle capacity and the physical dimensions of your brake shoes.
1. Find Your Axle Capacity (GAWR)
- The VIN Sticker:Look at the Federal Certification/VIN label located on the front driver-side exterior of your RV. Look for the GAWR(Gross Axle Weight Rating). It will usually say something like 3,500 lbs, 5,200 lbs, or 7,000 lbs per axle.
- The Axle Tag:Crawl under the trailer and look at the center of the axle tube. There is often a metal tag or sticker from the manufacturer (like Dexter or AL-KO) stating the exact capacity.
2. Measure Your Brake Assembly
Electric trailer brakes are measured by two numbers: the Diameterof the drum and the Widthof the brake shoe. You can measure the diameter across the backing plate, and use a tape measure to check the width of the friction material on the shoe.
- 10" x 2 1/4" Brakes: These are the standard size for most 3,500 lbaxles. They attach to the axle flange with 4 bolts.
- 12" x 2" Brakes: These are standard for heavier 5,200 lb to 7,000 lbaxles. They typically attach to the axle flange using 5 bolts.
Brakes Worn Out? Replace the Entire Assembly
If adjusting the star wheel isn't helping, your brake shoes or magnets might be shot. It is almost always more cost-effective and easier to replace the entire trailer electric brake assembly than to rebuild it with individual parts.
A new pre-assembled backing plate gives you a brand new magnet, shoes, springs, and hardware. They are incredibly easy to install—simply remove the four or five mounting bolts on the axle flange, pull the old plate off, bolt the new one on, and connect the two wires.
*As an Amazon Associate, this site earns from qualifying purchases.